A Simple Guide for react-intl Integration in React

Integrate and automate your translations with react-intl
(6 minute read)
Last updated: May 2026
Prefer a different library?
Which library should I choose? Compare them: react-i18next vs react-intl
Getting Started
Today we’re going to learn how to setup internationalization in a React app by integrating the very popular react-intl library. It’s a lot easier than you think!
I’m going to quickly set up a new React project using Vite.js. For this tutorial, it doesn’t matter if you use Vite, create-react-app, or another tool for creating your React app.
$ npm create vite@latest
After running npm install to install the initial dependencies, I’m going to install two libraries that we will need to make our project multilingual: react-intl and browser-lang.
$ npm install react-intl browser-lang
The browser-lang package is a popular and simple JavaScript library for detecting and selecting a user’s preferred language in their browser. You can certainly write this language detection logic yourself, but we’re going to keep it simple with browser-lang.
Let’s start it up! 🚀
$ npm run dev
react-intl + i18nexus
When using react-intl, developers often have many lengthy json files that contain translations for each supported language. All of these files except for the developer’s native language are empty until they hire professional translators.
That sounds horrible! 🫠
Instead we’re going to use i18nexus to manage and machine translate all of our translations for us! When we’re ready to hire professional translators, we just invite them to our i18nexus project to edit and confirm the machine translations. It’s a much easier workflow and we get to experience our app in other languages immediately!
Let’s do it!
If you don’t already have an i18nexus account, sign up for a free account. After naming our project we’ll be directed to our language dashboard:
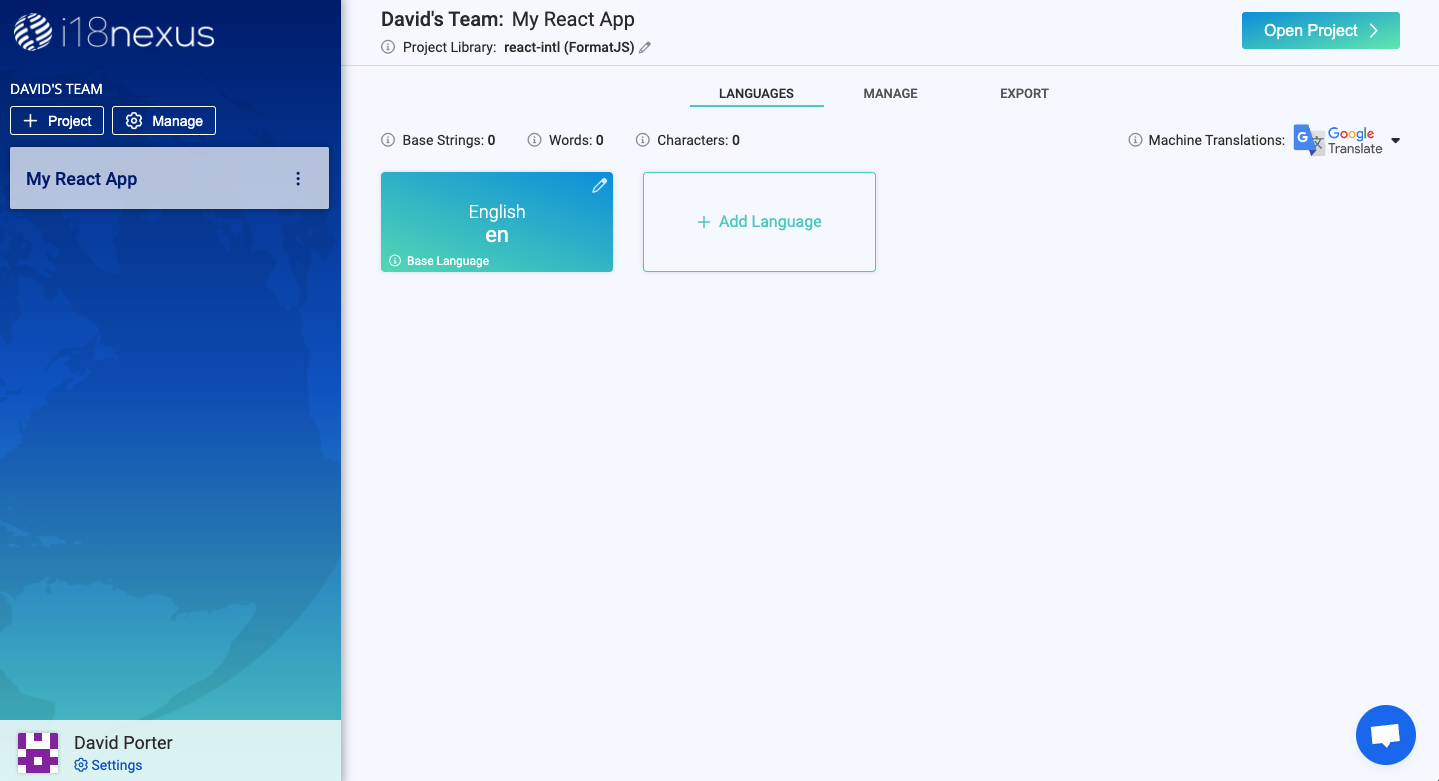
The first language tile is your base language. This should be your native language.
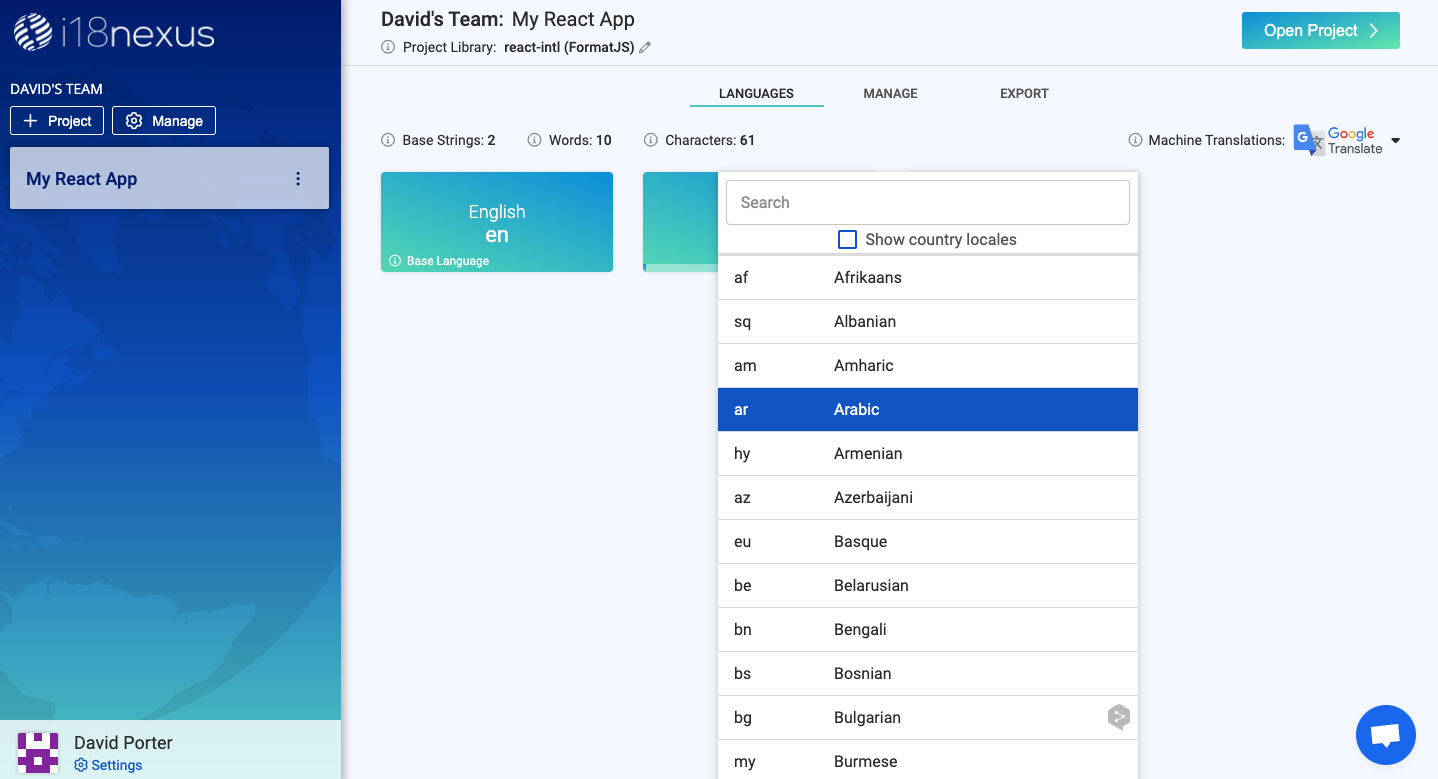
Let’s click the Add Language button to select a language that we want our app to support. You can select as many as you would like. I’m going to choose Spanish (es) and Arabic (ar):
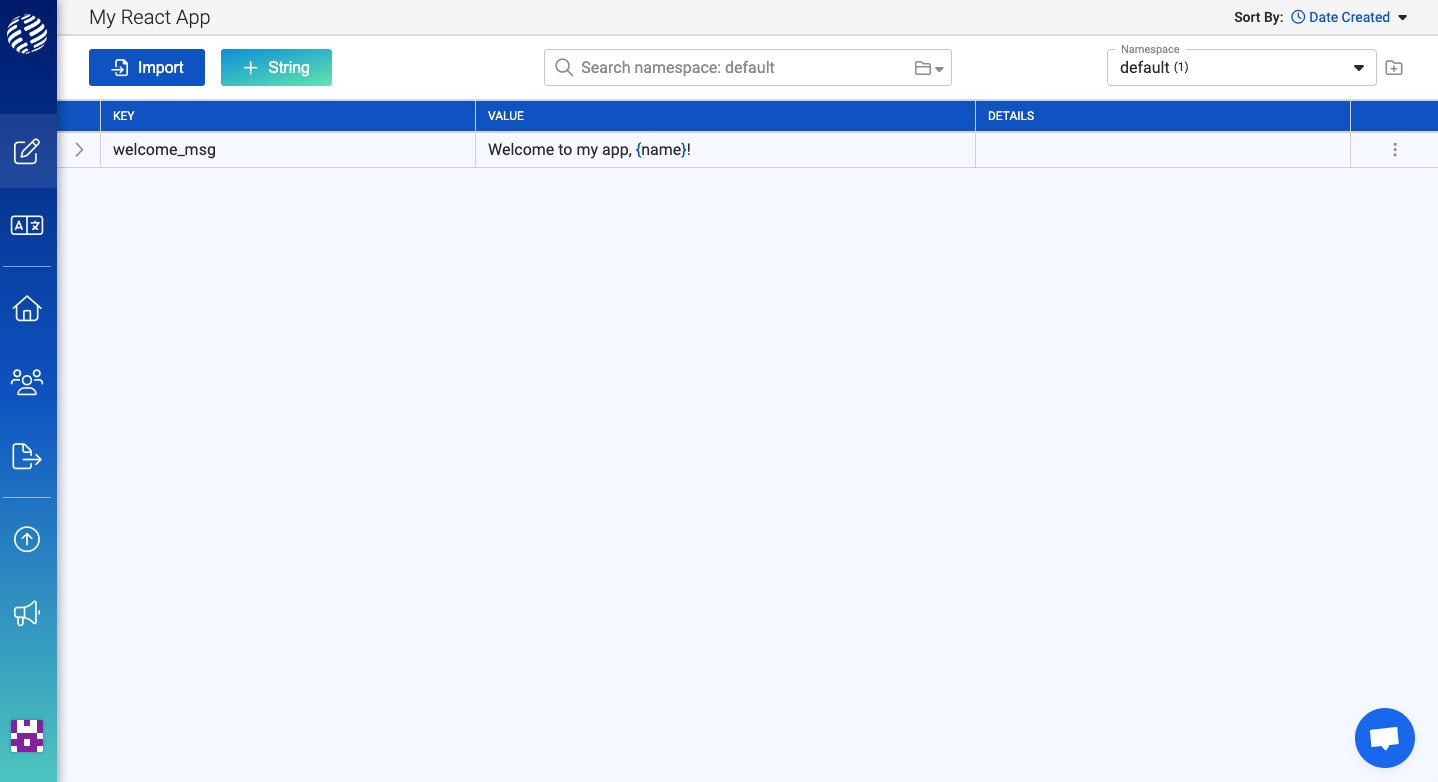
Now let’s click Open Project in the top right corner of the page to go to the Strings Management page.
On this page I’m going to click Add String. Let’s add a string that will appear in the home page of our app:
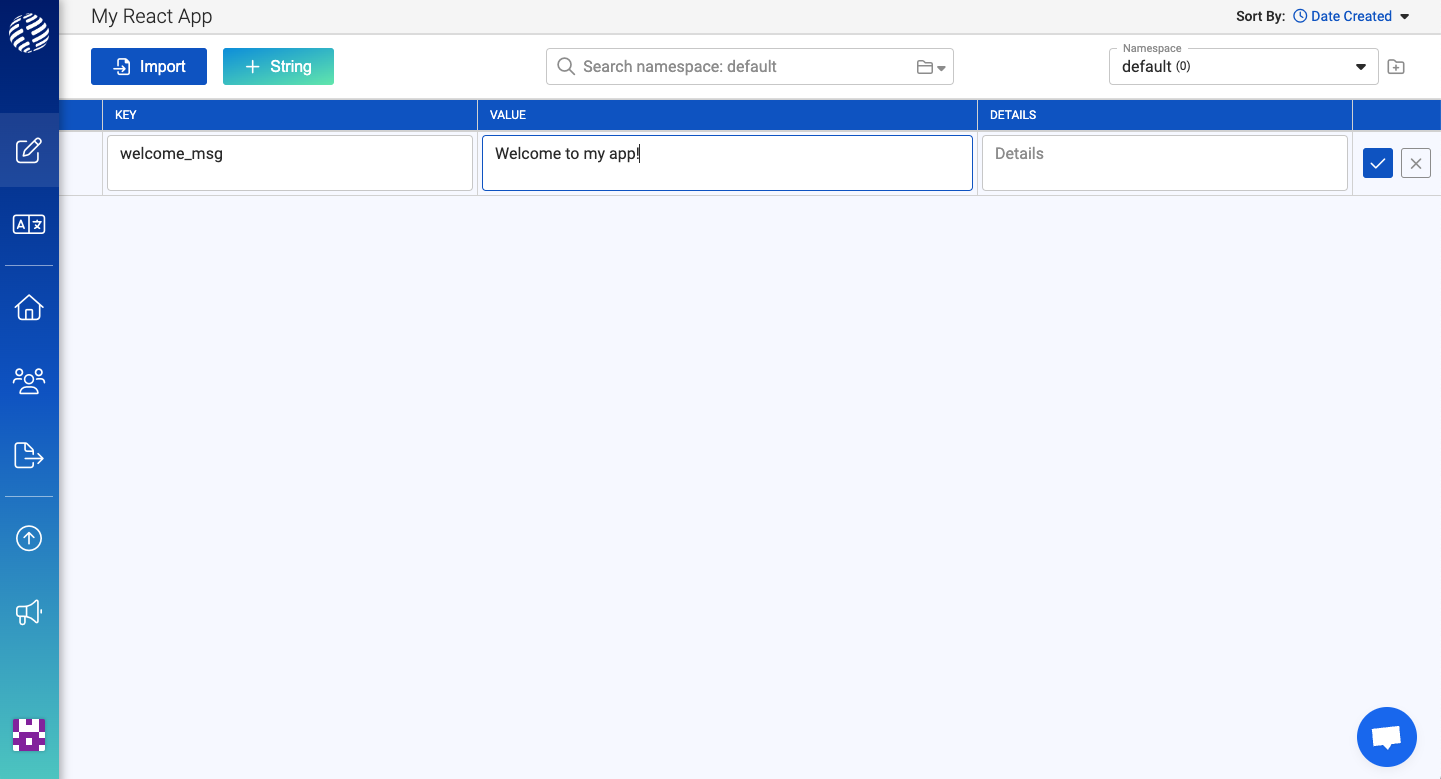
The key is how we will reference the string in our React code.
The value is the text that will be rendered in our app to our users.
The details field is optional. It is meant to provide any extra information about the context of your string for when you’re ready to bring in professional translators. You can also add an image here for more context.
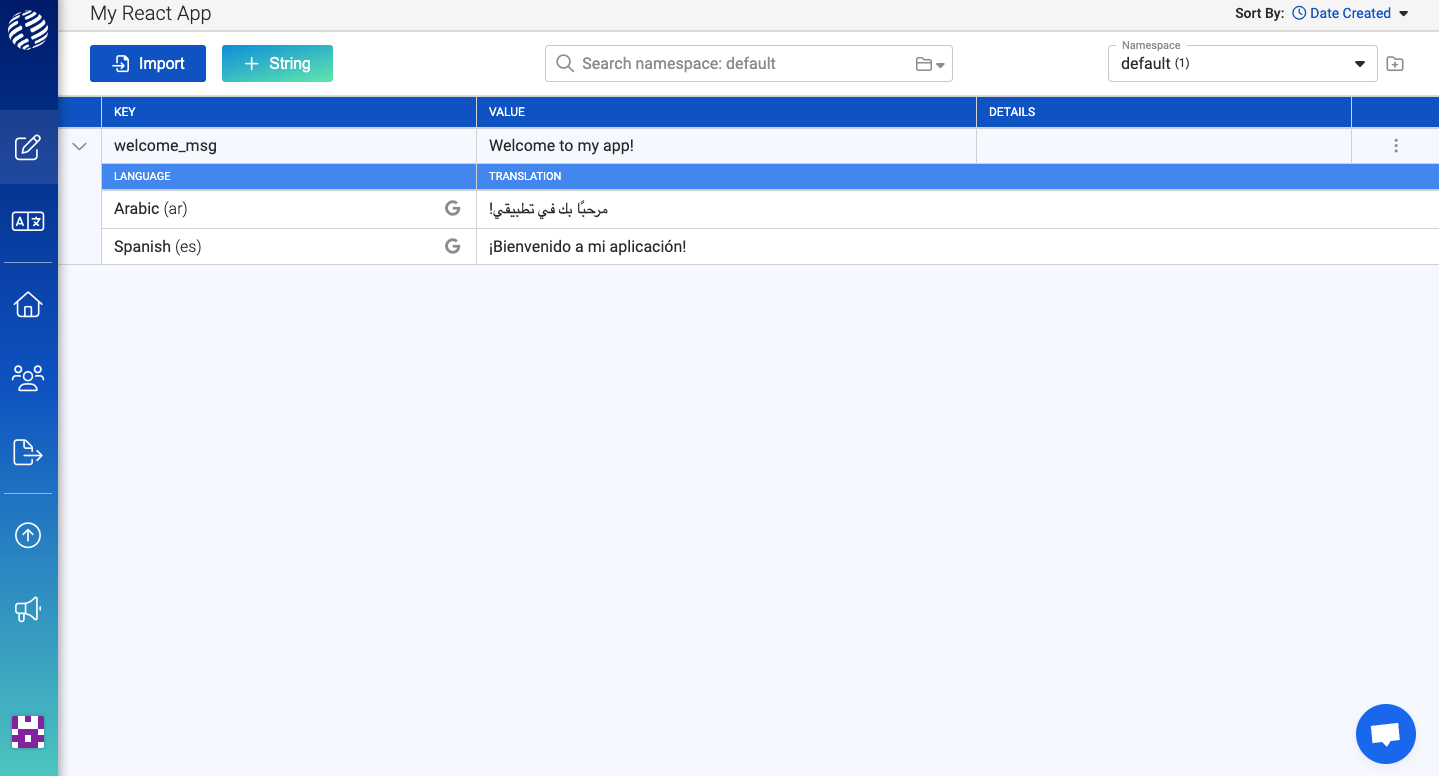
Now that we’ve added our first string, let’s expand the row to see the translations that i18nexus generated for us with Google Translate:
Awesome!
Lastly, you’ll notice in the top right corner of the page there is a dropdown for namespaces that already contains one namespace named “default”.
For small to mid-size apps, it’s probably fine to put all your strings in one namespace. But for larger apps, you may want to separate your strings into different namespaces by page or component so that your app doesn’t have to load all your strings in memory on app load. We will just use one namespace in this tutorial, but it’s a useful feature as your app scales!
Putting it all together
Let’s jump back to our code and integrate react-intl into our app so that we can render our new translations.
I haven’t yet made any changes to the default App.jsx file generated with Vite.js. I’m going to just going clean it up a little, so now it looks like this:
src/App.jsximport reactLogo from './assets/react.svg';
import viteLogo from '/vite.svg';
import './App.css';
export default function App() {
return (
<div className="App">
<div>
<a href="https://vitejs.dev" target="_blank">
<img src={viteLogo} className="logo" alt="Vite logo" />
</a>
<a href="https://reactjs.org" target="_blank">
<img src={reactLogo} className="logo react" alt="React logo" />
</a>
</div>
<h1>Vite + React</h1>
<p>Welcome to my app!</p>
</div>
);
}The page currently looks like this in my browser:
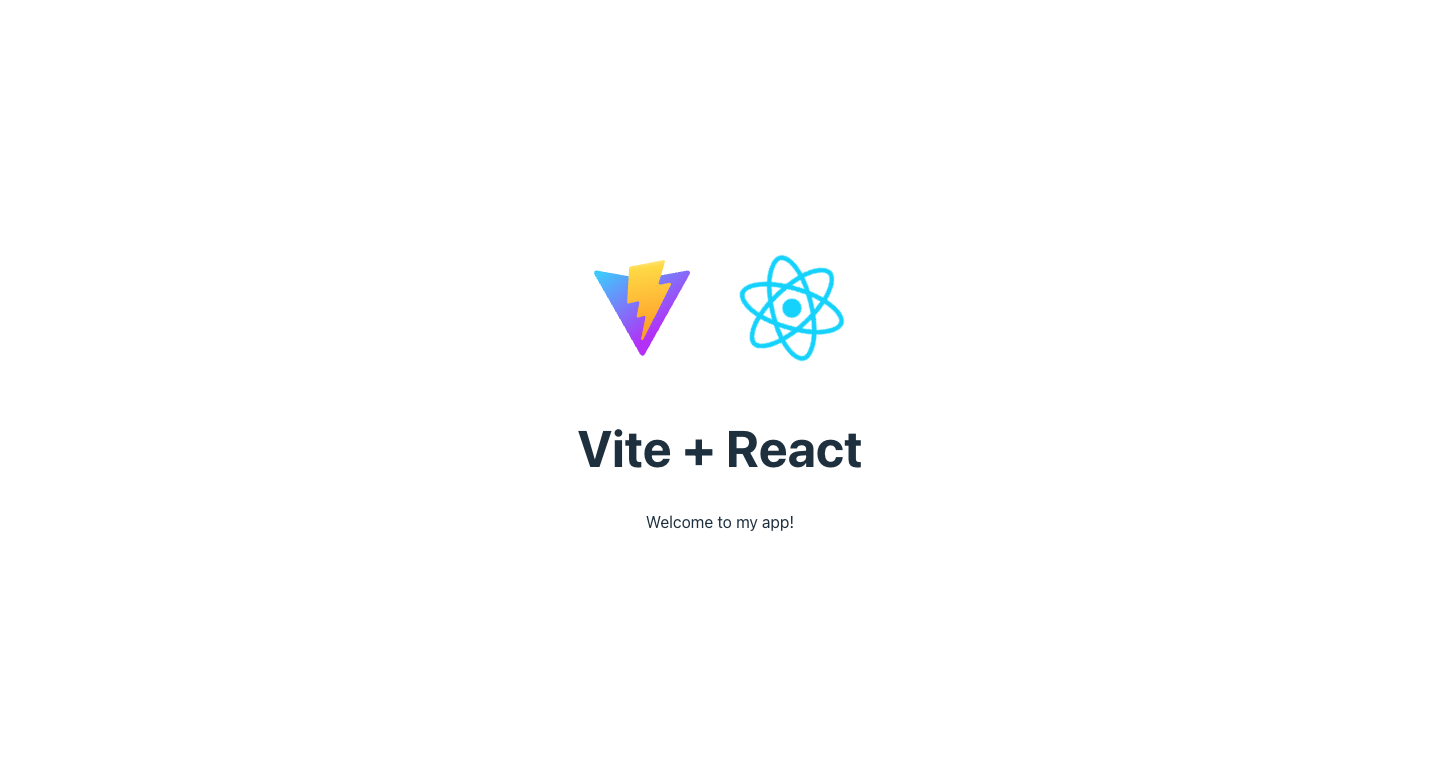
Our goal is going to be to replace the “Welcome to my app!” text with our dynamic translations in i18nexus.
The first thing we’re going to do is get the user’s default language from the browser so we know which locale to render to the user when the app loads. As mentioned earlier, we’re going to use the browser-lang library to do this.
At the top of the file I’m going to import browserLang. I’m then going to call it with the list of languages our app supports as well as a fallback language for when a language is detected that our app doesn’t support:
src/App.jsximport reactLogo from './assets/react.svg';
import viteLogo from '/vite.svg';
import './App.css';
import browserLang from 'browser-lang';
const supportedLanguages = ['en', 'es', 'ar'];
export default function App() {
const defaultLocale = browserLang({
languages: supportedLanguages,
fallback: 'en'
});
return (
<div className="App">
<div>
<a href="https://vitejs.dev" target="_blank">
<img src={viteLogo} className="logo" alt="Vite logo" />
</a>
<a href="https://reactjs.org" target="_blank">
<img src={reactLogo} className="logo react" alt="React logo" />
</a>
</div>
<h1>Vite + React</h1>
<p>Welcome to my app!</p>
</div>
);
}The supportedLanguages array is simply a list of locale codes that we are using in i18nexus.
Next, we’re going to use the useState hook to store the current locale in component state:
const [locale, setLocale] = useState(defaultLocale);
We’ll also go ahead and initialize a state variable for our “messages”. This will be an object of key/value pairs for each of our strings stored in i18nexus. The react-intl library refers to strings as “messages”:
const [messages, setMessages] = useState(null);
Let’s populate our “messages” state by fetching our strings from the i18nexus API in a useEffect hook. (If you would prefer not to fetch your translations at run time, you can use the @i18nexus/cli to download your translations at build time.)
The URL to fetch translations is:
https://api.i18nexus.com/project_resources/translations/:locale/:namespace?api_key=:project_api_key
We will need to include the locale of the translations we want to fetch, as well as the namespace (“default”). Lastly, include your project’s API key which can be found in the Export page of your project in i18nexus.
Now our component should look like this:
src/App.jsximport reactLogo from './assets/react.svg';
import viteLogo from '/vite.svg';
import './App.css';
import browserLang from 'browser-lang';
import { useEffect, useState } from 'react';
const supportedLanguages = ['en', 'es', 'ar'];
export default function App() {
const defaultLocale = browserLang({
languages: supportedLanguages,
fallback: 'en'
});
const [locale, setLocale] = useState(defaultLocale);
const [messages, setMessages] = useState(null);
useEffect(() => {
const apiKey = 'YOUR API KEY';
fetch(
`https://api.i18nexus.com/project_resources/translations/${locale}/default?api_key=${apiKey}`
)
.then(response => response.json())
.then(data => {
setMessages(data);
});
}, [locale]);
return (
<div className="App">
<div>
<a href="https://vitejs.dev" target="_blank">
<img src={viteLogo} className="logo" alt="Vite logo" />
</a>
<a href="https://reactjs.org" target="_blank">
<img src={reactLogo} className="logo react" alt="React logo" />
</a>
</div>
<h1>Vite + React</h1>
<p>Welcome to my app!</p>
</div>
);
}Now let’s integrate react-intl to render our strings!
First, we’ll import two components from react-intl:
import {IntlProvider, FormattedMessage} from “react-intl”
The IntlProvider will wrap our application and provide our current locale and messages to all the components in our whole app.
The FormattedMessage component will take a message’s key as a prop and render the corresponding value based on the current locale. To render the “welcome_msg” string that we added in i18nexus earlier, all we need to do is use FormattedMessage like so:
<FormattedMessage id="welcome_msg" />
Let’s go ahead and replace the static “Welcome to my app!” text with FormattedMessage. Here is our entire App.jsx component now:
src/App.jsximport reactLogo from './assets/react.svg';
import viteLogo from '/vite.svg';
import './App.css';
import browserLang from 'browser-lang';
import { useEffect, useState } from 'react';
import { FormattedMessage, IntlProvider } from 'react-intl';
const supportedLanguages = ['en', 'es', 'ar'];
export default function App() {
const defaultLocale = browserLang({
languages: supportedLanguages,
fallback: 'en'
});
const [locale, setLocale] = useState(defaultLocale);
const [messages, setMessages] = useState(null);
useEffect(() => {
const apiKey = 'YOUR API KEY';
fetch(
`https://api.i18nexus.com/project_resources/translations/${locale}/default?api_key=${apiKey}`
)
.then(response => response.json())
.then(data => {
setMessages(data);
});
}, [locale]);
return (
<IntlProvider locale={locale} messages={messages}>
<div className="App">
<div>
<a href="https://vitejs.dev" target="_blank">
<img src={viteLogo} className="logo" alt="Vite logo" />
</a>
<a href="https://reactjs.org" target="_blank">
<img src={reactLogo} className="logo react" alt="React logo" />
</a>
</div>
<h1>Vite + React</h1>
<p>
<FormattedMessage id="welcome_msg" />
</p>
</div>
</IntlProvider>
);
}Since my browser’s default language is English, react-intl is using the English translation to render to the screen:
Perfect! 🎉
One last thing we’re going to want to do is prevent loading the app until our translations are done being fetched from i18nexus. Otherwise react-intl won’t have the message to render for a brief second. I’ll just add a simple loading message:
src/App.jsx...
const [locale, setLocale] = useState(defaultLocale);
const [messages, setMessages] = useState(null);
const [isLoadingLocale, setIsLoadingLocale] = useState(true);
useEffect(() => {
const apiKey = 'YOUR API KEY';
fetch(
`https://api.i18nexus.com/project_resources/translations/${locale}/default?api_key=${apiKey}`
)
.then(response => response.json())
.then(data => {
setMessages(data);
setIsLoadingLocale(false);
});
}, [locale]);
if (isLoadingLocale) {
return <div>Loading...</div>;
}
return (
<IntlProvider locale={locale} messages={messages}>
...Changing Languages
We should also allow users to change the language of our app in case they would prefer a language other than the default.
All we need to do is change the locale in state. To do this, let’s create a simple <select> dropdown by using the supportedLanguages array that we already defined. We’ll put it at the top of the page:
src/App.jsx...
return (
<IntlProvider locale={locale} messages={messages}>
<div className="App">
<select onChange={event => setLocale(event.target.value)}>
{supportedLanguages.map(locale => (
<option value={locale} key={locale}>
{locale}
</option>
))}
</select>
<div>
<a href="https://vitejs.dev" target="_blank">
<img src={viteLogo} className="logo" alt="Vite logo" />
</a>
<a href="https://reactjs.org" target="_blank">
<img src={reactLogo} className="logo react" alt="React logo" />
</a>
</div>
<h1>Vite + React</h1>
<p>
<FormattedMessage id="welcome_msg" />
</p>
</div>
</IntlProvider>
);
...Now we can use this dropdown to change the language to Spanish:

We’re multilingual! 🌎
Interpolation
Now that we’ve rendered a simple string in our app, let’s try adding more complex strings so that we can see the full power of react-intl and i18nexus.
Let’s edit our “welcome_msg” string to use interpolation. In i18nexus, I’m going to change the value to “Welcome to my app, {name}!”:
The react-intl library uses the ICU Message Format standard. To interpolate a dynamic value such as a user’s name, you simply wrap a variable of your choice in curly braces. We then assign the variable in the values prop of FormattedMessage:
<FormattedMessage id="welcome_msg" values={{ name: 'Chris' }} />
Now we can dynamically change the name depending on our current user’s name! Check it out:

Pluralization
Sometimes our strings will need to have multiple plural forms. For example, look at this string:
You have {count} new notifications.
If the count is 1, we don’t want to say “You have 1 new notifications”. We want it to say “You have one new notification”. English only has a singular and plural form that we have to worry about, but some languages like Arabic have up to 6 different plural forms!
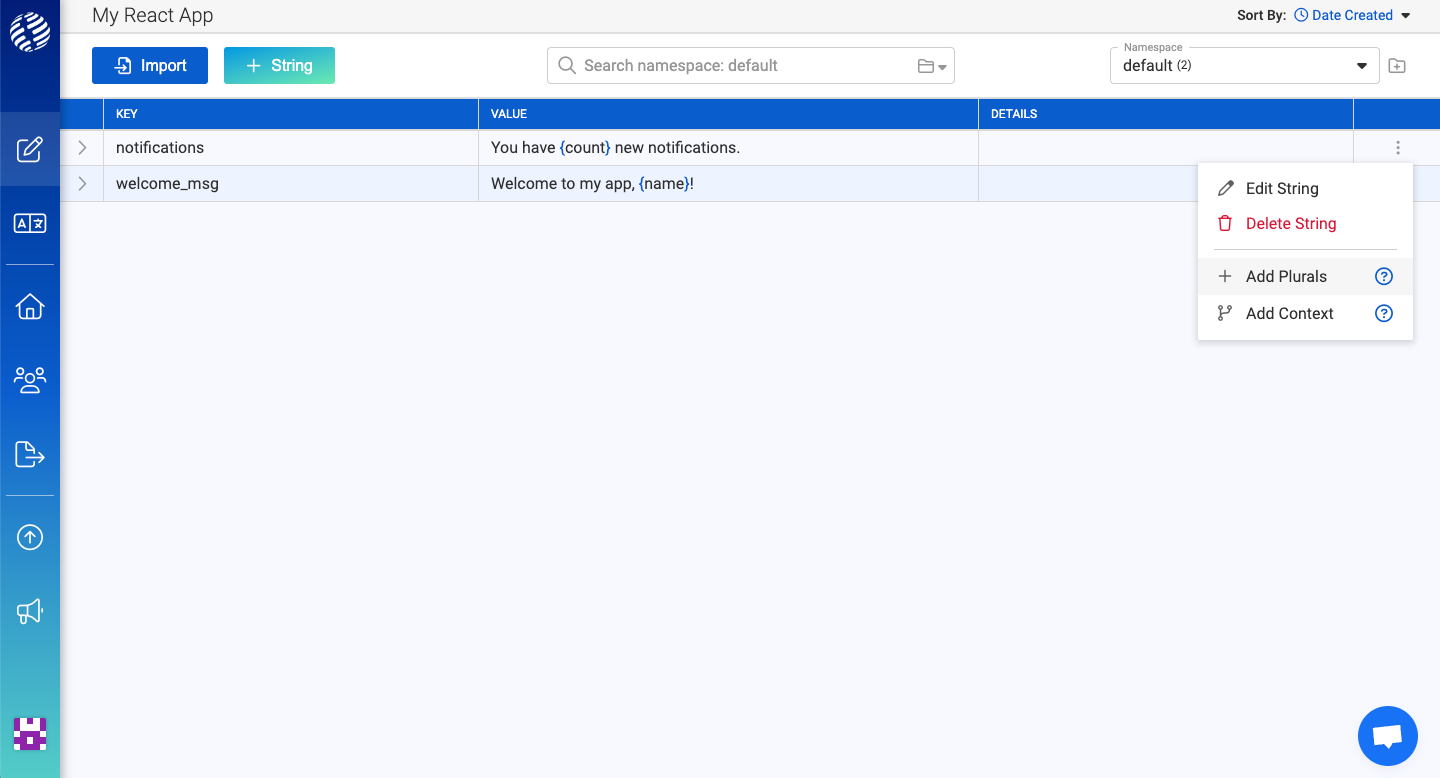
Plural forms for different languages can be a huge pain to manage. But lucky for us i18nexus makes it super easy. Let’s create a new string with key “notifications” and value “You have {count} new notifications”.
In the dropdown menu on the right of the row, let’s click to use the pluralization feature in i18nexus:
Now we see this:
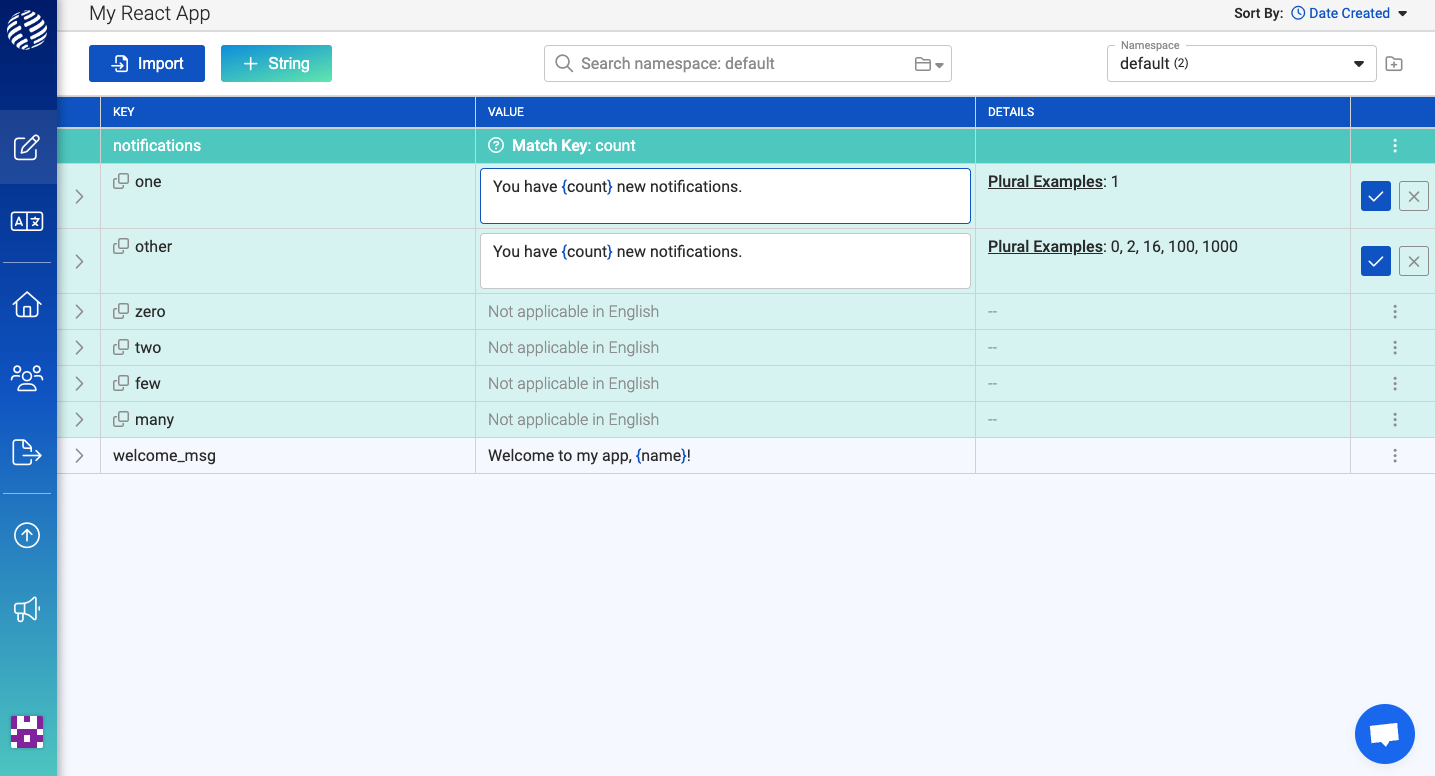
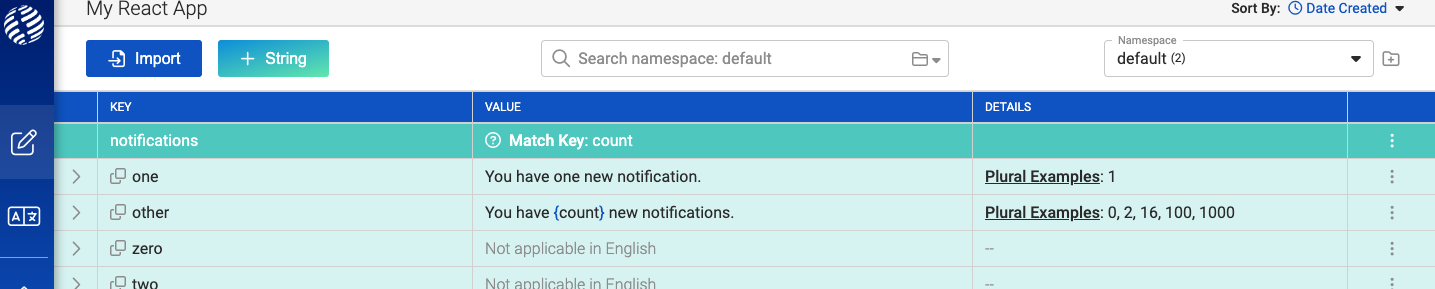
Let’s update the singular form (one) to be grammatically correct. We don’t have to worry about the other 4 plural forms because they don’t apply in English. Our Arabic translators will have to handle those.
The only reason we see the four other rows for “zero”, “two”, “few” and “many” is because we included Arabic in our project. If we didn’t add Arabic, we wouldn’t see them in our project. When you’re ready to hire professional translators, your Arabic translators will be shown 6 plural translations to edit while your Spanish translators will only be shown 2 (like English).
Try managing this without i18nexus... 🫠
Finally, let’s render this plural translation using FormattedMessage:
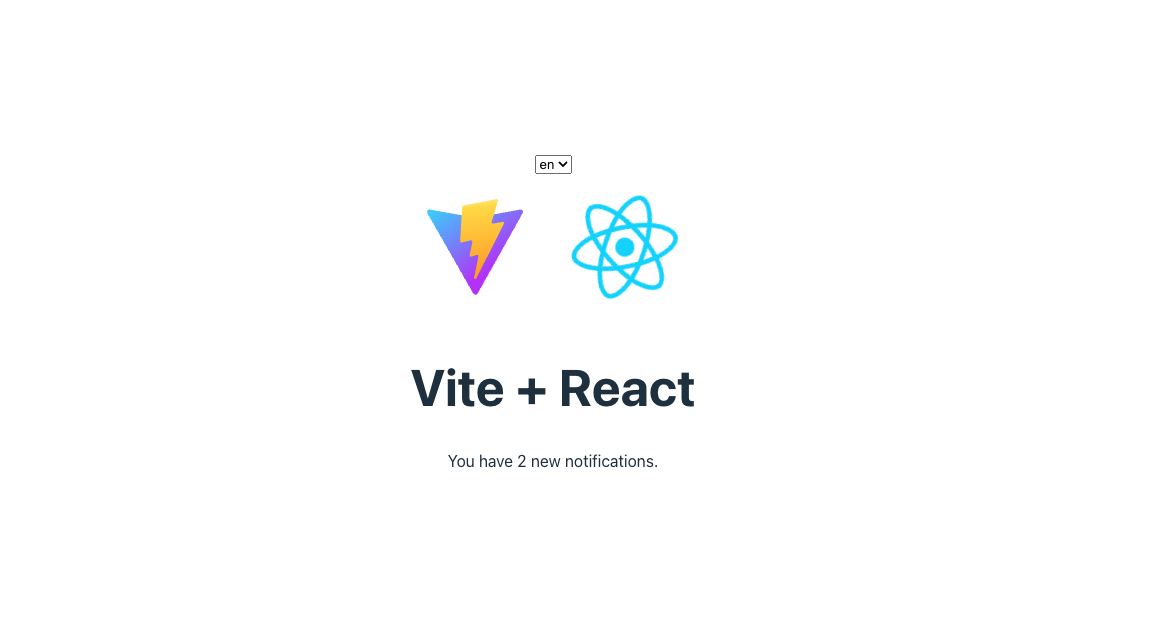
<FormattedMessage id="notifications" values={{ count: 2 }} />
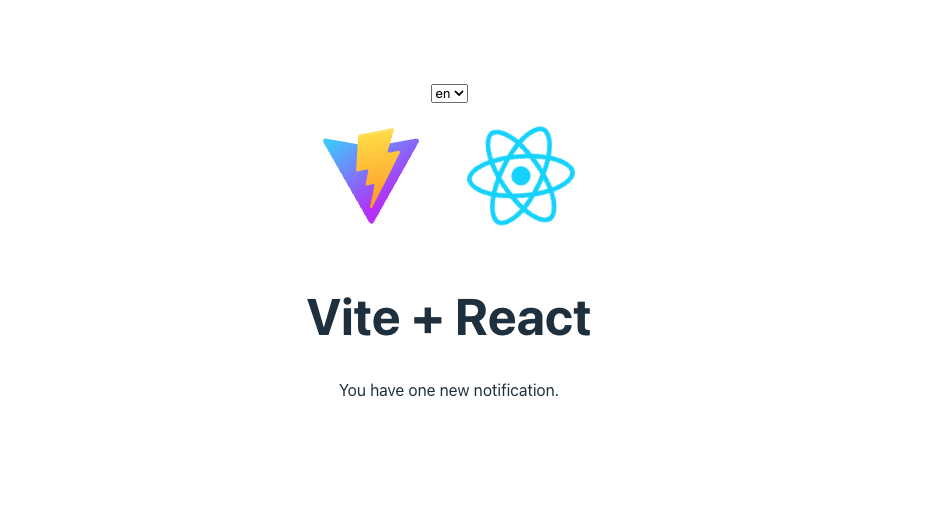
Now let’s change the count to 1...
Well, that was easy!
To sum it up
You’re now an internationalization ninja! 🥷 We’ve not only learned how to set up react-intl in our React app, but also how to automatically machine translate and manage our strings in i18nexus. We also learned how to implement both interpolation and pluralization with react-intl for real world use cases.
To learn more about other react-intl features, I recommend reading their documentation here. If you need any help integrating, feel free to reach out to us in the in-app chat in the bottom right corner of this page. Happy internationalizing!
Level up your localization
It only takes a few minutes to streamline your translations forever.
Get started