Next.js App Router with react-intl (Tutorial)

A complete guide for Next.js i18n with the App Router
(6 minute read)
Last updated: May 2026
Available Next.js i18n Tutorials:
Which library should I choose? Compare them: next-i18next vs next-intl, react-i18next vs react-intl, next-i18next vs react-intl
Introduction
In this tutorial, we are going to learn how to set up internationalized routing and react-intl in a Next.js app using the App Router.
With the introduction of the App Router, we gained a lot of great new features including Server Components. However, Next.js no longer has built-in internationalized routing. But don’t worry! Setting up internationalized routing is quite simple 🙂
Project Set Up
To get started, I’ve created a very simple Next.js project that uses the new App Router:
npx create-next-app@latest
I’ve edited the page component to look like this:
app/page.jsimport ExampleClientComponent from 'components/ExampleClientComponent';
export default function Home() {
return (
<main>
<h1>Welcome to my app!</h1>
<ExampleClientComponent />
</main>
);
}This page is a Server Component. Any code written here will be run on our server. All pages by default are Server Components when using the App Router.
Inside my page I am rendering a custom Client Component that looks like this:
components/ExampleClientComponent.js'use client';
export default function ExampleClientComponent() {
return <h2>Hello from a Client Component!</h2>;
}Nice and simple 🙂
Here is what is rendered to the page:

Dependencies
$ npm install next-i18n-router react-intl
next-i18n-router: A lightweight package to implement internationalized routing, locale detection, and optional locale cookie setting in App Router projects.
react-intl: One of the most popular React internationalization libraries for rendering translations and localizing dates and numbers
Internationalized Routing
Let's set up our internationalized routes. All of the languages that our app supports (except for our default language), will be prefixed in the pathnames of our pages. For example: /de/products. If you also want the pathnames for your default language to be prefixed, that is easily configurable later.
Let's configure next-i18n-router to initialize our supported languages, detect the current visitor’s preferred language, and redirect them to the correct locale path!
Setup can be done in just 3 steps:
1) Create Config
First, we're going to create a config for next-i18n-router in a file called i18nConfig.js at the root of our project:
i18nConfig.jsconst i18nConfig = {
locales: ['en', 'de', 'ja'],
defaultLocale: 'en'
};
module.exports = i18nConfig;2) Add Dynamic Segment
Next, we need to nest all the pages and layouts in our app directory in a dynamic segment named [locale]:
└── app

    └── [locale]

        ├── layout.js

        └── page.js
3) Add Middleware
Create a file at the root of your project called middleware.js. Here’s what your file should look like:
middleware.jsimport { i18nRouter } from 'next-i18n-router';
import i18nConfig from './i18nConfig';
export function middleware(request) {
return i18nRouter(request, i18nConfig);
}
// applies this middleware only to files in the app directory
export const config = {
matcher: '/((?!api|static|.*\\..*|_next).*)'
};The i18nRouter function is simple but powerful. On each request, it will check the current visitor’s preferred language based on the accept-language in the request headers. It will then redirect the visitor to the closest preferred language. The defaultLocale will be used if it is a language we do not support.
If you prefer custom locale detection, you can read about the optional localeDetector option in the next-i18n-router docs.
We now have internationalized routing! ⚡️
Make sure to restart your dev server before testing.
We should now be able to visit localhost:3000, localhost:3000/de, and localhost:3000/ja to view the home page. If our browser language is different from the defaultLocale, we will be redirected to the correct language path!
Let's move on to see how we access the current language and integrate react-intl.
react-intl
Setting up react-intl with the App Router is a little different from setting it up with the Pages Router. This is because we now need to be able to support Server Components. But don’t worry, it’s quite simple!
react-intl Messages
First we need to set up the messages that we’re going to be rendering in our app.
I’m going to use i18nexus to auto-translate and store my messages for me. The old way of storing messages in a bunch of JSON files is burdensome and difficult to maintain, especially when you get to the point of hiring professional translators.
Create an i18nexus project and select react-intl as your project library.
In the dashboard, add the locales that your app supports. In my case, I’m using English, German, and Japanese:
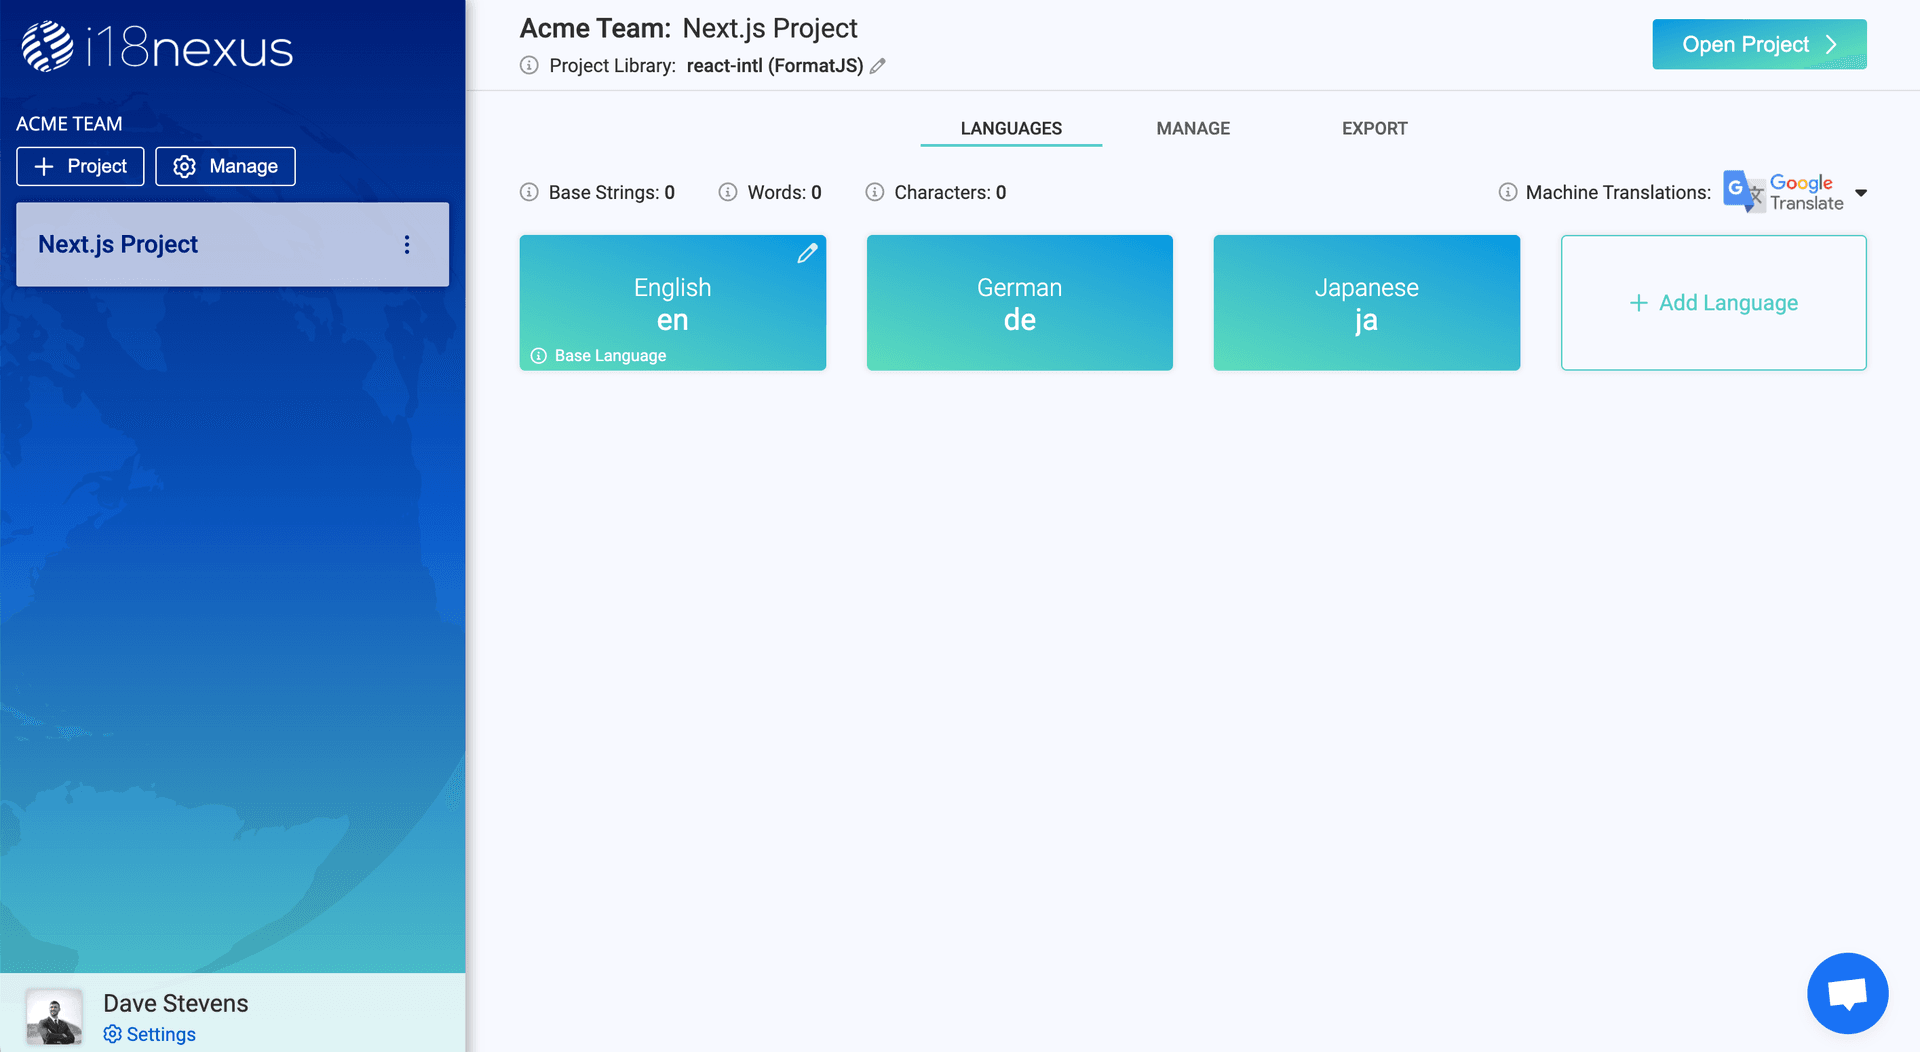
After adding our languages, let’s click Open Project and add a string:
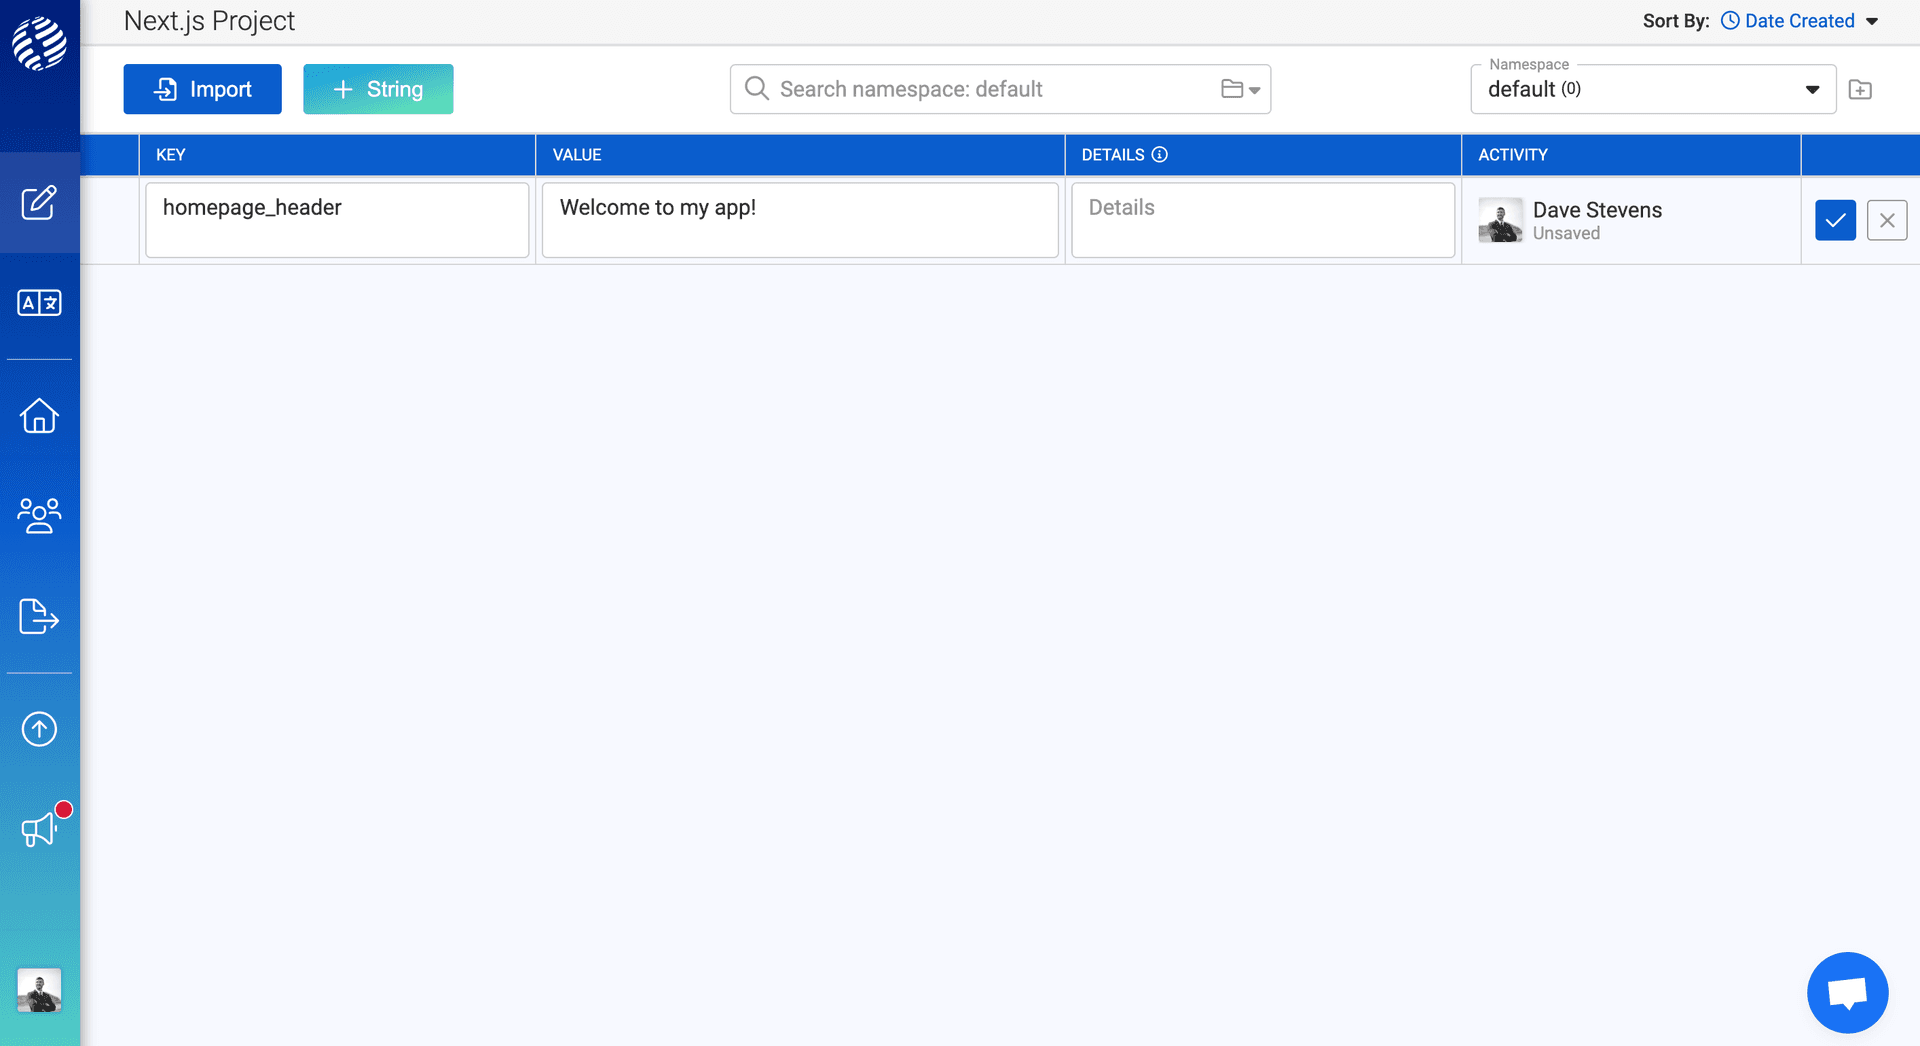
The key is what will be used to reference this message in react-intl.
The value is the text that will be rendered on the screen to our users.
The details field is optional. This is where you can add notes about a string such as what page it’s on or the context it is used. It is just for internal use with your team.
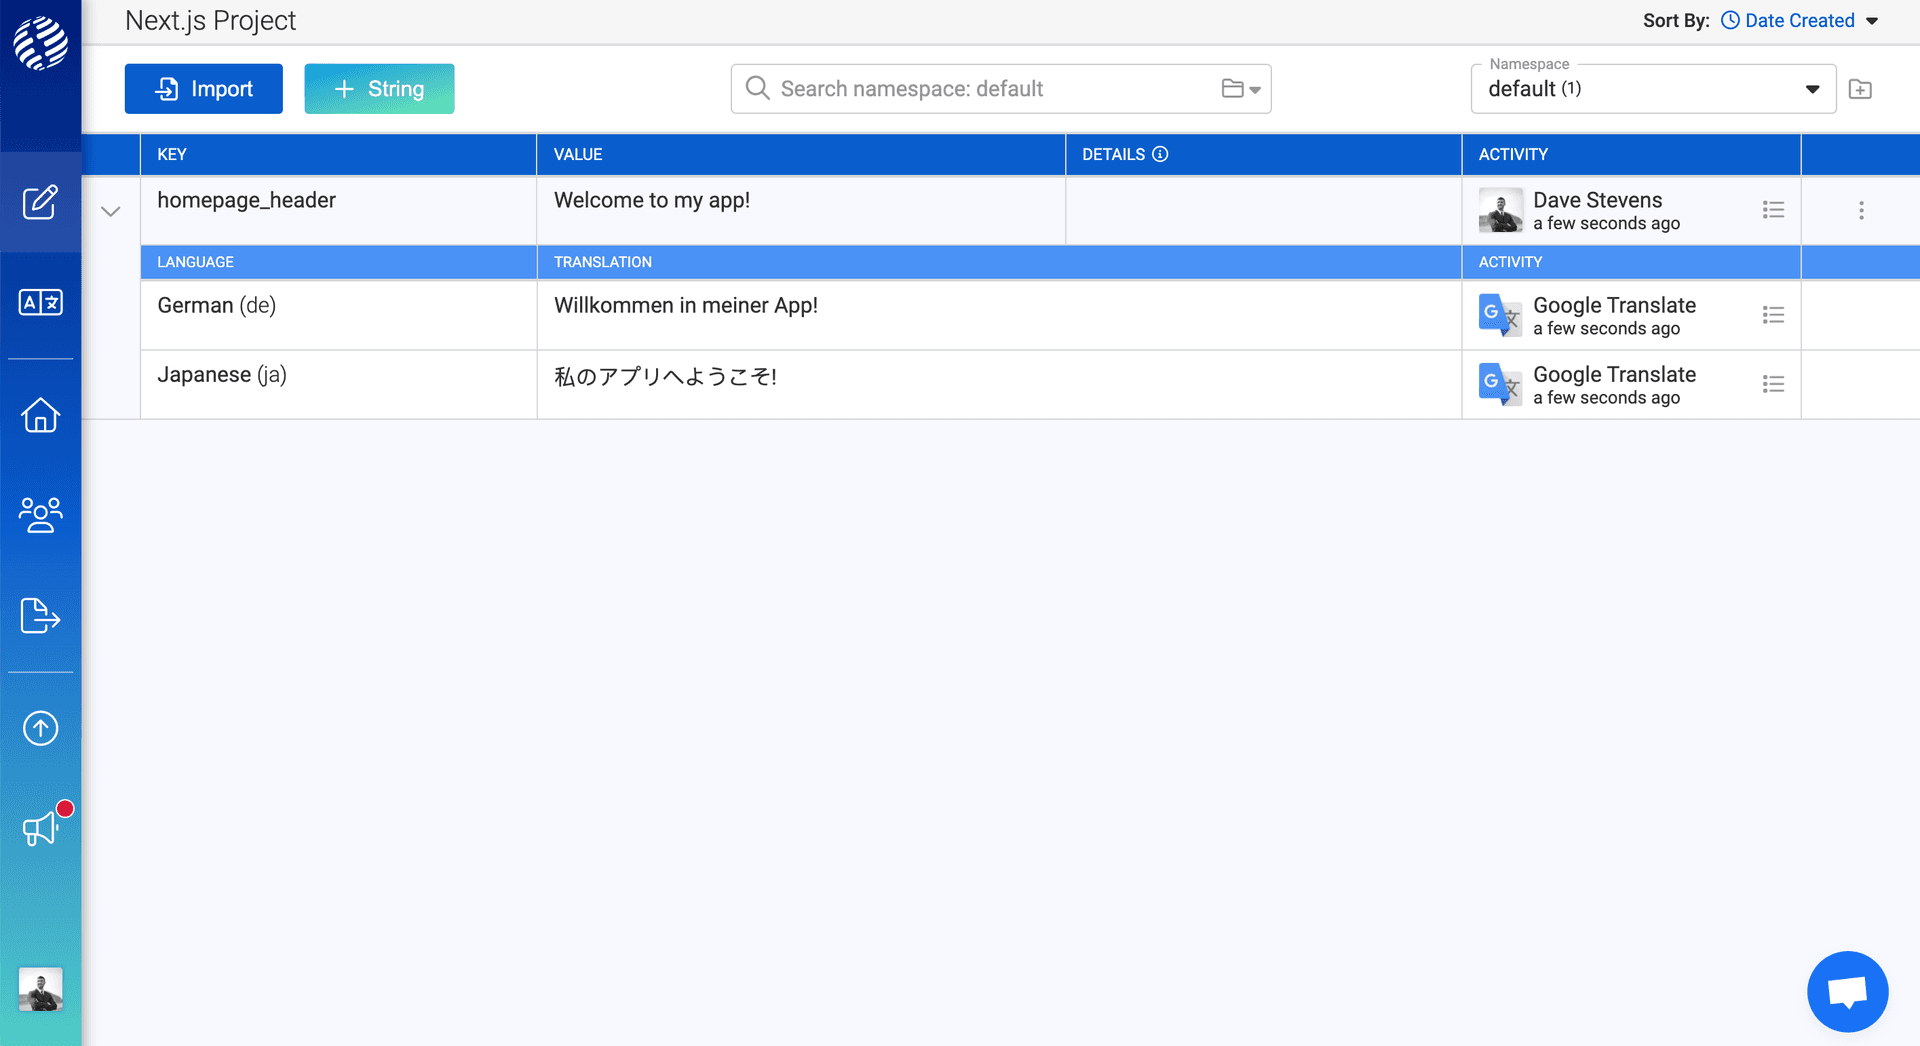
After saving, we can expand the row to see that our message is automatically machine translated for us to our supported languages:
Awesome!
Namespacing
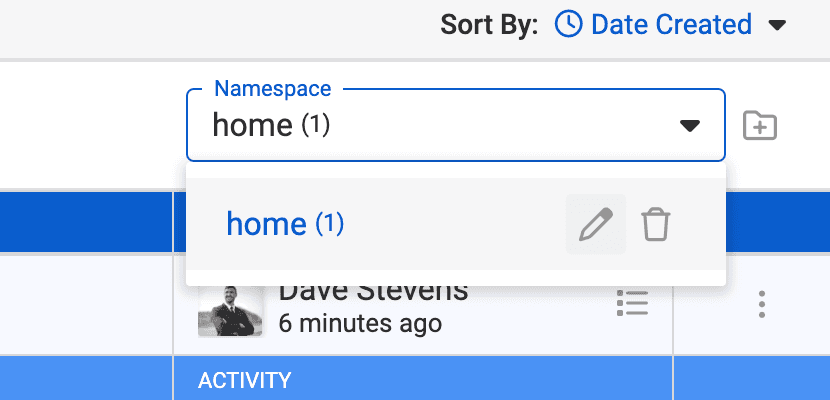
It is recommended to namespace messages per page in your app. That way we only need to load the required messages for the current page.
In the top right corner of the page in i18nexus, we are currently in a namespace called “default”. Let’s rename this namespace to “home”:
Using the CLI
To get our translations into our app, we're going to use the @i18nexus/cli to download our messages:
$ npm install @i18nexus/cli -g
Before we use the CLI, we need to go to the Export page in i18nexus and grab our API key. We will then add the key as an environment variable in our app:
.envI18NEXUS_API_KEY="your_api_key"Finally, we will run the pull command to download our messages:
$ i18nexus pull
You should now see a folder named messages at the root of your project that contains all of your messages and auto-translations! ⚡️
For convenience, let's also pull our translations automatically every time we start up our dev server or build by adding the command to each of our scripts in package.json:
package.json...
"scripts": {
"dev": "i18nexus pull && next dev",
"build": "i18nexus pull && next build",
"start": "i18nexus pull && next start",
"lint": "next lint"
},
...To ensure that the build works in all environments, it is smart to install @i18nexus/cli as a dev dependency as well:
$ npm install @i18nexus/cli --save-dev
react-intl in Server Components
The react-intl library works great as-is in Client Components, but for use in Server Components we’ll need to create a helper function.
We will create a file called intl.js in our app directory and define a function called getIntl to be used by Server Components. This component will use the base intl library that comes installed with react-intl.
app/intl.js'server-only';
import { createIntl } from '@formatjs/intl';
export default async function getIntl(locale, namespace) {
return createIntl({
locale: locale,
messages: (await import(`@/messages/${locale}/${namespace}.json`)).default
});
}Alright! Now let’s use getIntl in our Home page to render a message:
app/[locale]/page.jsimport getIntl from 'app/intl';
import ExampleClientComponent from 'components/ExampleClientComponent';
export default async function Home({ params: { locale } }) {
const intl = await getIntl(locale, 'home');
return (
<main>
<h1>{intl.formatMessage({ id: 'homepage_header' })}</h1>
<ExampleClientComponent />
</main>
);
}The above code is using getIntl to create an intl instance server-side, allowing us to render our message by passing the key to formatMessage. We are getting the current locale from the path params.
I’m now going to navigate to http://localhost:3000/de and I should see the header in German:

That was easy 🎉
react-intl in Client Components
Using react-intl with a Client Component is no different than using it with a normal client-side-rendered React app.
All we need to do wrap our page with the IntlProvider from react-intl.
To use the IntlProvider, it needs to be in its own file. Let’s create a component in components/ServerIntlProvider.js:
components/ServerIntlProvider.js'use client';
import { IntlProvider } from 'react-intl';
export default function ServerIntlProvider({ messages, locale, children }) {
return (
<IntlProvider messages={messages} locale={locale}>
{children}
</IntlProvider>
);
}Now we’ll wrap our page with ServerIntlProvider:
app/[locale]/page.jsimport ServerIntlProvider from 'components/ServerIntlProvider';
import getIntl from 'app/intl';
import ExampleClientComponent from 'components/ExampleClientComponent';
export default async function Home({ params: { locale } }) {
const intl = await getIntl(locale, 'home');
return (
<ServerIntlProvider messages={intl.messages} locale={intl.locale}>
<main>
<h1>{intl.formatMessage({ id: 'homepage_header' })}</h1>
<ExampleClientComponent />
</main>
</ServerIntlProvider>
);
}In the above code, the ServerIntlProvider is providing the messages we loaded server side to all the Client Components in this page. This includes deeply nested Client Components.
We ONLY need to wrap the top level page with this provider.
Rendering Translations in Client Components
Currently my ExampleClientComponent looks like this:
components/ExampleClientComponent.js'use client';
export default function ExampleClientComponent() {
return <h2>Hello from a Client Component!</h2>;
}Let’s add this static text as a string in i18nexus:
I am now going to use react-intl’s useIntl hook to render this message in the component:
components/ExampleClientComponent.js'use client';
import { useIntl } from 'react-intl';
export default function ExampleClientComponent() {
const intl = useIntl();
return (
<h2>
{intl.formatMessage({ id: 'homepage_subheader' })}
</h2>
);
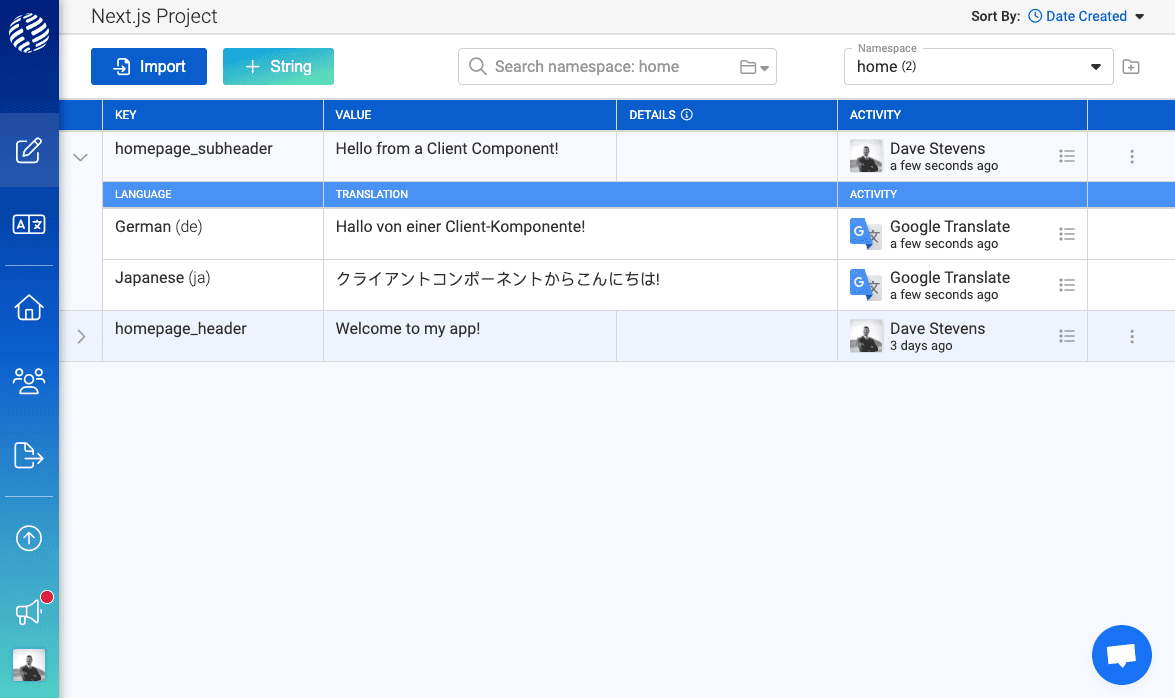
}Now let’s run i18nexus pull to get our new translations and then take a look at localhost:3000/de:

Our page is fully translated! 🎉
Remember: Server Components are not able to use hooks. The useIntl hook imported from react-intl is only able to be used in Client Components. When using formatMessage in Server Components, make sure to use the getIntl function we defined in app/intl.js.
Static Params (SSG)
Finally, let's update our layout to use generateStaticParams. This will generate static routes at build time for all of our supported languages:
app/[locale]/layout.jsimport './globals.css';
import { Inter } from 'next/font/google';
import i18nConfig from '@/i18nConfig';
const inter = Inter({ subsets: ['latin'] });
export const metadata = {
title: 'Create Next App',
description: 'Generated by create next app'
};
export function generateStaticParams() {
return i18nConfig.locales.map(locale => ({ locale }));
}
export default function RootLayout({ children, params: { locale } }) {
return (
<html lang={locale}>
<body className={inter.className}>{children}</body>
</html>
);
}Bonus: Language Changer
Oftentimes we want to let our users change the language themselves. Let’s create a menu for changing languages.
Let’s create a Client Component called LanguageChanger:
components/LanguageChanger.js'use client';
import { useRouter } from 'next/navigation';
import { usePathname } from 'next/navigation';
import { useCurrentLocale } from 'next-i18n-router/client';
import i18nConfig from '@/i18nConfig';
export default function LanguageChanger() {
const router = useRouter();
const currentPathname = usePathname();
const currentLocale = useCurrentLocale(i18nConfig);
const handleChange = e => {
const newLocale = e.target.value;
// set cookie for next-i18n-router
const days = 30;
const date = new Date();
date.setTime(date.getTime() + days * 24 * 60 * 60 * 1000);
const expires = date.toUTCString();
document.cookie = `NEXT_LOCALE=${newLocale};expires=${expires};path=/`;
if (currentLocale === i18nConfig.defaultLocale && !i18nConfig.prefixDefault) {
router.push('/' + newLocale + currentPathname);
} else {
router.push(currentPathname.replace(`/${currentLocale}`, `/${newLocale}`));
}
router.refresh();
};
return (
<select onChange={handleChange} value={currentLocale}>
<option value="en">English</option>
<option value="de">German</option>
<option value="ja">Japanese</option>
</select>
);
}What’s going on here? This component is actually really simple.
The select menu calls handleChange with the newly selected language. We then set the NEXT_LOCALE cookie with the selected language and then redirect the user to the appropriate language path.
The next-i18n-router library will read the NEXT_LOCALE cookie and use that cookie to override the normal locale detection. As long as this cookie is set, the user will remain using this language as they navigate through our app!
You can read more about setting the locale cookie in the next-i18n-router docs.
Let’s render it in our page:
app/[locale]/page.jsimport ServerIntlProvider from 'components/ServerIntlProvider';
import getIntl from 'app/intl';
import ExampleClientComponent from 'components/ExampleClientComponent';
import LanguageChanger from 'components/LanguageChanger';
export default async function Home({ params: { locale }}) {
const intl = await getIntl(locale, 'home');
return (
<ServerIntlProvider messages={intl.messages} locale={intl.locale}>
<main>
<h1>{intl.formatMessage({ id: 'homepage_header' })}</h1>
<ExampleClientComponent />
<LanguageChanger />
</main>
</ServerIntlProvider>
);
}Drumroll please… 🥁

That’s a Wrap!
Our Next.js App Router project now has internationalized routing, locale detection, automatic machine translations, react-intl integration, and a language switcher!
We are now i18n pros 😎
To learn more about the available components with react-intl, check out the react-intl docs. For Server Components, you can view the imperative versions of the react-intl components in the intl docs.
Level up your localization
It only takes a few minutes to streamline your translations forever.
Get started